So Business List. Other Airplane Checklists. Not for Pilots but for Engineers
An article about those aviation checklists you've never heard of before. The post is co-written with Alexander Khvan, who worked at Airbus for 14 years.
The Most Famous Users of Checklists
Every boy and girl knows that two plus two equals four, that water is liquid, and that Boeing pilots invented the checklist phenomena in a form of before takeoff checklist. Yes, the very same list of actions that must be followed for the correct takeoff and the safety of the flight. It's also known as a pre-flight checklist. After all, the price of a mistake is very high, so caution is paramount for aviation safety.
Everything seems right about these three statements, except that pilots didn't invent checklists. But that's okay, don't stop admiring these brave people. Pilots regularly impress us as the most thoughtful users of checklists to run both normal procedures and emergency procedures. The importance of their input to the checklists world is impossible to overestimate.
For instance, they have done a comprehensive research of the paper qualities and discovered many benefits of using checklists displayed in electronic devices of the aircraft's control panel.
They've experimented with the form of the aviation checklists for a small plane, creating a list in the form of a switch box. It looks like an attachment to flight controls. One switch setting is for takeoff, and another is for landing. And this is not a bad idea because you can get distracted and forget what you did and what you didn't. Rather intuitive. Being able to restore memory at a glance seriously reduces the risk to a pilot.
Pilots even managed to influence space explorers! A special checklist on the glove of a spacesuit lists the procedures for working on the lunar module. Who could think of these kinds of carry-on essentials.😅
Amid all this glory, it often goes unnoticed that checklists in aviation are used not only by pilots but also by aircraft engineers — and they use them in even more inventive ways.
Today's Guest: Alexander Khvan
Could you expect such a twist? Aircraft engineers use checklists even more extensively than the crew! I'm sure that insightful and experienced readers of my blog might have imagined this. But imagining and knowing are two different things. Today, we will learn more from our wonderful guest, Alexander Khvan.
Nowadays, Alexander works as a project manager in IT. However, before that, he spent 14 years designing airplanes at one of the divisions of Airbus. That's substantial experience!
In “So List” Alexander will share with us the intricacies of working at Airbus and his experience in creating and meticulously testing aircraft components.
How to Build an Aircraft for Aviation Safety?
If you are Airbus, the question of building a plane is not a trivial one. You need to ensure a massive sequence of operations, stretching from conception to post-sales service. You need to have your plane ready for short flights, for long flights, for flying under different weather conditions.
Not only flying is expected these days from a plane, but also a decent number of comfortable services. They include a well-cooked in-flight meal, enough space for legs and for a carry-on bag under the next seat, comfortable chairs for sitting and sleeping. Furthermore, these days, we want a stable internet connection to be entertained during the flight. Airlines have to be inventive.
Nowadays, you can't just sit one talented employee down and expect them to guarantee the reliability of the plane and anticipate all the problems. A new civilian airplane today is the result of joint actions by thousands of people worldwide.
These actions need regular and high-quality checks, and the way to ensure that is through a checklist.
Designing an Airplane Wing
You might think we'll go shallow road here, but no. Alexander has decided that if we're tackling this seriously, we'll start with a real trip, a serious design project — the airplane wing.
From us, Alexander expects compliance with the requirements. From him, we ask for explanations of procedures and rules. Both we and he will gain support by a checklist. Not just one, but an entire tree of them. Let's go.
First, we need to prepare and break down the development of the plane wing into individual, actionable tasks. The approximate list of actions looks like this:
- Design the wing:
- Create drawings and 3D models for each part;
- Create drawings and 3D models for assembling the parts into large components;
- Create the final assembly drawing for the wing.
- Perform a strength and reliability analysis for the wing during operation:
- Analyze the strength and reliability of each individual part;
- Analyze the strength and reliability of large components;
- Analyze the overall behavior of the wing.
When is the checklist used here? At every stage. Whether we are developing a part, assembling a set of parts into larger components, or analyzing the overall behavior of the wing during the strength testing phase, a checklist is needed at every step. It's prepared in advance. More on this in the last part of the post.
The result of our work will be the design documentation. Its creation requires both two stages of work and inspections after each individual task. All these calculations are necessary to confirm the strength and reliability of the airplane.
It's clear that we don't need to describe the full complexity of the wing right now. But if the design process were to be divided into two phases, and each of them into separate tasks, the scheme would look something like this.
Designing       Checking  Analysis       Checking
┌──────────┐              ┌──────────┐
│          │    ☐ ───     │          │   ☐ ───
│ Airplane │ →  ☐ ─── →   │ Airplane │ → ☐ ───  ☑→ Airplane
│ wing     │    ☐ ───     │ wing     │   ☐ ───     wing
│          │    ☐ ───     │          │   ☐ ───     designed
├──────────┘              ├──────────┘
┊                         ┊
┊┌──────────┐             ┊┌──────────┐
├┤ Part #1  │ → ☐ ─── →   ├┤ Part #1  │ → ☐ ─── ☑→ Part #1
┊│          │   ☐ ───     ┊│          │   ☐ ───    designed
┊├──────────┘             ┊├──────────┘
┊┊                        ┊┊
┊├┈┬─────────┐            ┊├┈┬─────────┐
┊┊ │Task #1  │ → ☐ ─── →  ┊┊ │Task #1  │ → ☐ ─── ☑→ Task #1
┊┊ └─────────┘            ┊┊ └─────────┘            completed
┊└┈┬─────────┐            ┊└┈┬─────────┐
┊  │Task #2  │ → ☐ ─── →  ┊  │Task #2  │ → ☐ ─── ☑→ Task #2
┊  └─────────┘            ┊  └─────────┘            completed
┊                         ┊
┊┌──────────┐             ┊┌──────────┐
└┤ Part #2  │ → ☐ ─── →   └┤ Part #2  │ → ☐ ─── ☑→ Part #2
 │          │   ☐ ───      │          │   ☐ ───    designed
 ├──────────┘              ├──────────┘
 ┊                         ┊
 ├┈┬─────────┐             ├┈┬─────────┐
 ┊ │Task #1  │ → ☐ ─── →   ┊ │Task #1  │ → ☐ ─── ☑→ Task #1
 ┊ └─────────┘             ┊ └─────────┘            completed
 ├┈┬─────────┐             ├┈┬─────────┐
 ┊ │Task #2  │ → ☐ ─── →   ┊ │Task #2  │ → ☐ ─── ☑→ Task #2
 ┊ └─────────┘             ┊ └─────────┘            completed
 └┈┬─────────┐             └┈┬─────────┐
   │Task #3  │ → ☐ ─── →     │Task #3  │ → ☐ ─── ☑→ Task #3
   └─────────┘               └─────────┘            completed
What does this diagram show? It outlines the procedures we'll go through. However, we won't go too much into details, but only cover the important.
Tackling the Tasks
We'll start acting step by step. Task #1 of the first part of the design phase will be our first job. Let's assume this task involves calculating the dimensions of the wing. We perform the necessary actions and produce a result. But this isn't the final result — it still needs to go through a review.
Here's where the checklist comes into play. We go through the list, checking the correctness of our actions. Let's assume everything is good, and all items are in place. Is Task #1 ready for the analysis stage? If we were in a field where safety wasn't as critical, maybe. But we're in aviation, and that's not how it works.
As we know, airplanes are built by teams. In the team, there is a role called the checker. The most experienced team members take turns being the checker, it's like a type of duty. The checker takes the checklist and starts evaluating the correctness of the calculations. If something fails the check, the task is sent back for revision. And indeed, one item didn't pass the check this time due to its non-normal behavior in stress conditions. This data is passed back to the first engineer.
No worries, we've worked hard, the design flaw has been fixed. The checklist now passes successfully for both us and the checker. Can we congratulate ourselves on completing Task #1? Not yet — the team leader now steps in. Once we get the approval, this means that the Checking for Task#1 is complete. We move on to Task #2.
Of course, the inspections don't stop there. Our wing will go through many more checks, both within the design department during the analysis phase and later at Airbus, concluding with reviews by international oversight bodies. The wing needs to comply with all the requirements. This approach might sound like the one lacking efficiency. But I guess it doesn’t matter for people that much. If compared the speed of development and aviation safety, people will choose the system to rely on and not the one that is simply fast.
Overcoming the Challenges of Task #2
Task #1 went relatively smoothly, but inspections don't always go that way. There might be cases where a point on the checklist is difficult to meet. Let's say we're designing the attachment of the wing to the fuselage. Our job is to ensure a safe resource during different operating conditions: takeoff, landing, and more. The wings themselves have significant weight. Alexander worked as a strength engineer, so this is right up his alley.
What do we do with a stubborn checklist point in our task? Despite all our efforts during self-checks, we keep running into difficulties. In management, there's a saying: “Eat an elephant one bite at a time”. I am not sure how the elephant feels about that, but the idea is to break down big and complex tasks until they become understandable and manageable.
So we start breaking down our checklist item into smaller items. If it appears even more complex, we might need a new format—a subtask. The subtask gets its checklist too. It's not a problem to create as many tasks and subtasks as required when it comes to passenger safety.
The rules for accepting a subtask are the same as for a task. First, the executor checks the necessary items. Then, the checker steps in. Finally, the team leader approaches the subtask with the same checklist.
Once Task #2 is developed, it's time for the checklist for the first part of the wing. If the inspections are successful, the equipment is accepted. Here again, the executor, the checker, and the team leader are involved.
Finalizing the Wing
After completing two tasks and finishing the first part of the wing, we still have to design the remaining part. It's a bit like the joke about drawing an owl. We won't go into further detail about preventing problems in the second stage of design, since we already understand the procedures.
Where Do Checklists Come From?
In our strength engineering department, new checklists keep appearing. Do engineers come up with these lists every time? No, two tools help them create checklists:
- The “20 Boxes” rule;
- A checklist database for standard processes.
The “20 Boxes” Rule
Alexander explained that the “20 Boxes” rule was used to break down projects, tasks, and subtasks. Why boxes? Because the process steps in a BPMN process diagram look a lot like boxes. Browse through this example [1]:
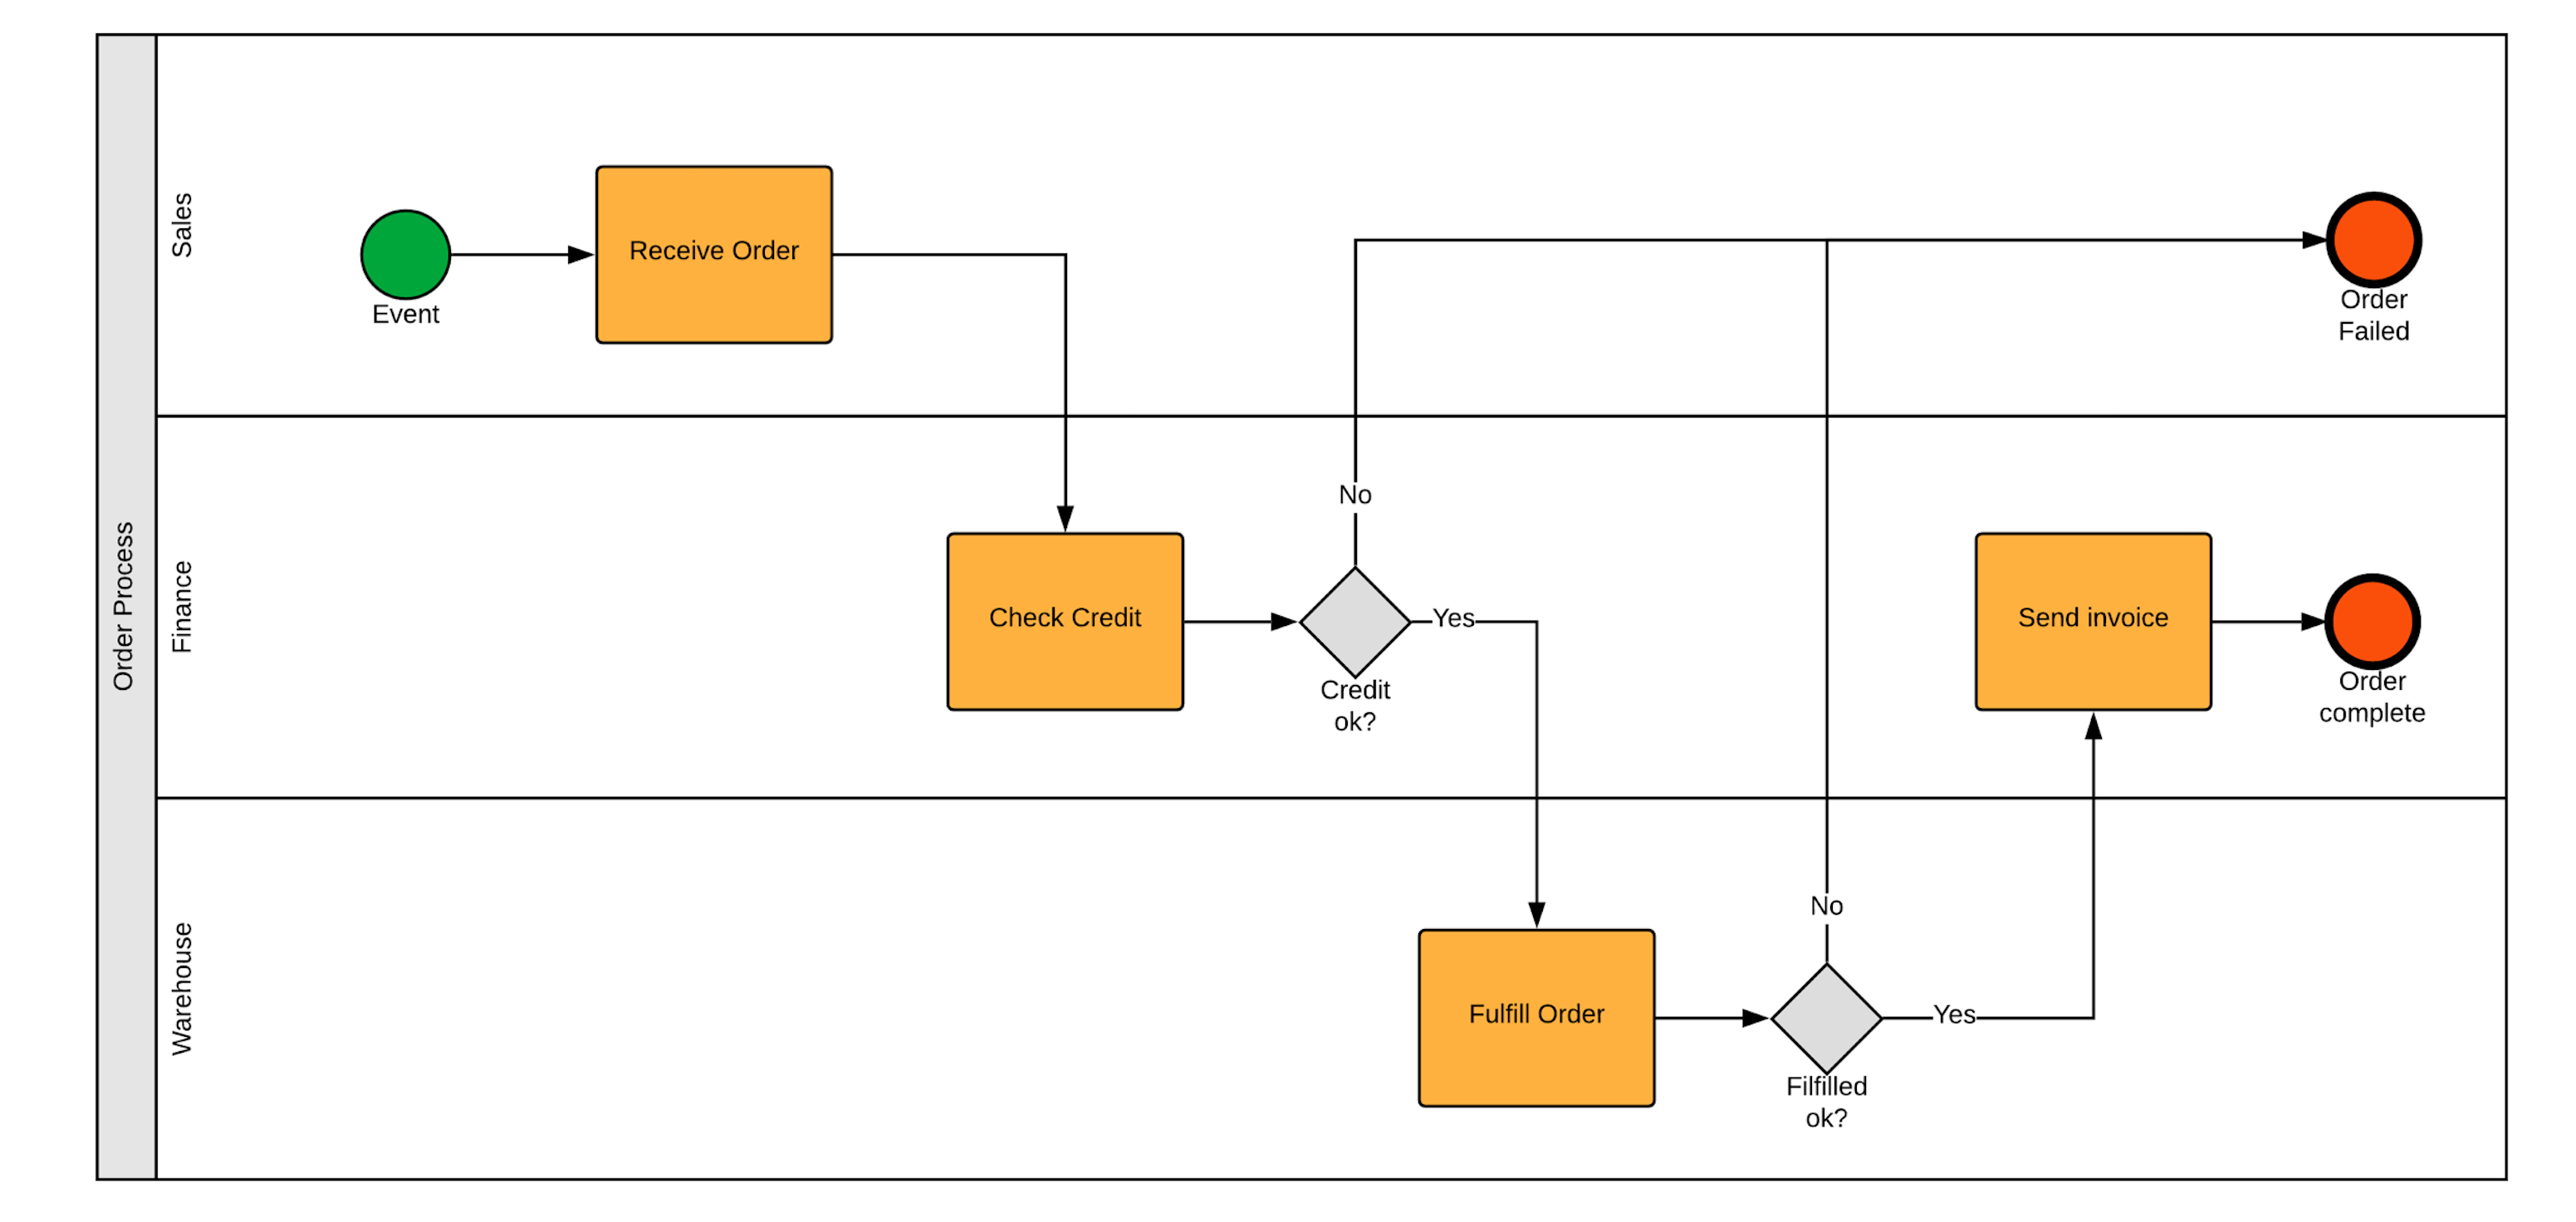
See the orange rectangles that look like boxes? That's where the name comes from.
The rule goes like this:
Any relatively complex engineering process can be broken down into 20 steps.
If you end up with 18 steps or 23 steps, that doesn't mean you should rush to fix errors. The rule is empirical, meaning it's a useful guideline developed through frequent use of this method of decomposition.
The “20 Boxes” rule, applied repeatedly, helps break down the entire design of a wing or even an entire plane into manageable tasks. And since each task or work stage should have its checklist, this breakdown gives us a clue as to how many checklists we'll need.
To imagine the “20 Boxes” rule, think of a tree. “Design the wing” is our trunk. The trunk splits into 20 stages — 20 branches. Each branch then has 20 smaller branches. This continues until it is time for the checklist items—the leaves on each branch.
Tasks obtained through repeated decomposition have a remarkable property: they are partially or fully standard. And that's where the checklist database comes in.
Checklist Database for Standard Processes
Various design tasks are similar, even though each is unique in its time, place, and context—assuming we are still designing airplanes. If last time it was a plane, and now it's a barn, there will be fewer standard actions.
At Airbus, there's a checklist database for standard processes. When we create a task, it becomes clear that despite its uniqueness, something needs to be done that's been done before. Just like before, we need to help pilots and passengers take off and fly to their destination. The engineer looks at the task components, recognizes what has been encountered before, and pulls the necessary checks from the knowledge base. However, as Alexander mentioned, the experienced engineers can draft a new checklist without relying on the knowledge base, since the entire work process is already structured in their mind.
At this stage, the basis of the checklist is created. It just has to be supplemented with items specific to this particular task, and we can start working.
Conclusion
While pilots may have claimed all the glory as the users of checklists, they aren't the only ones in aviation to use them, as we've seen today. Assessing the airplane's condition before takeoff or landing is crucial. Even more crucial is designing the plane in a way that ensures the crew can use it correctly. Of course, flying is a very complex process, and not everything can be automated. But if some actions can be delegated to technology, it's worth taking advantage of that.
Thanks to Alexander Khvan, today we've learned how checklists are used in a part of aviation that remains unseen by many. The next time you go with your carry-on luggage on a long flight, think of all this checklists-based complexity surrounding you. It's all the hidden part of a check-iceberg. My thanks to Alexander for providing that much information. If you'd like, you can reach him via his Telegram-channel.
If you'd like to thank me for this material, subscribe to the blog. There's an extra perk for you: blog posts appear one day before they go live on Reddit, Hacker News or in Threads.

